How to read golf buggy controller fault codes
Written by the Hawke Electric Vehicles Service Team
Quick answer
Most golf buggy controllers report faults through a status light that flashes a pattern, or through a handheld or dash display that shows a code. Read the code by counting the flashes in each group, then look the pattern up in the chart for your controller, because the numbers mean different things on different systems. The code points to the area at fault, such as the throttle, a contactor or the motor, so it saves you guessing where to start.
What this fixes
This procedure resolves the faults covered in these guides.
Tools needed
- The controller or vehicle manual for your model
- A torch to see the status light
- Handheld programmer or display where fitted
- Notepad
What this fixes
This procedure helps you read and interpret the fault code your controller is reporting, so you know which system to investigate. It is the first step behind many symptoms: a buggy in limp mode, one that beeps, or one that will not move often has a code waiting to be read. It does not repair the fault itself; it tells you where to look. Once you have the code and the area it points to, move to the matching guide, and remember that clearing a code without fixing the cause only means it returns.
Tools and parts
Parts
- The controller or vehicle manual for your exact model, which carries the code chart
- A handheld programmer or dash display, where your system uses one instead of a flashing light
You will need the code chart for your controller, which lives in the manual, a torch to see the status light clearly, and a notepad. Some systems show a numeric code on a handheld programmer or a dash display instead of flashing a light. This is an easy task. The only thing that makes it hard is not having the chart for your specific controller, because the same flash count means different faults on different systems.
How to do it
1Find the status light or display
Locate the controller and its status light, usually a small LED on the controller body, or find the dash or handheld display if your system uses one. The manual shows where it is on your model.
ExpectedThe status light or display located and visible with the key on
2Power up and let the fault repeat
Turn the key on and, if the fault only appears when you try to drive, recreate the condition safely with the buggy chocked. Watch the light run through its pattern, or read the code on the display.
ExpectedA repeating flash pattern or a numeric code shown while the fault is present
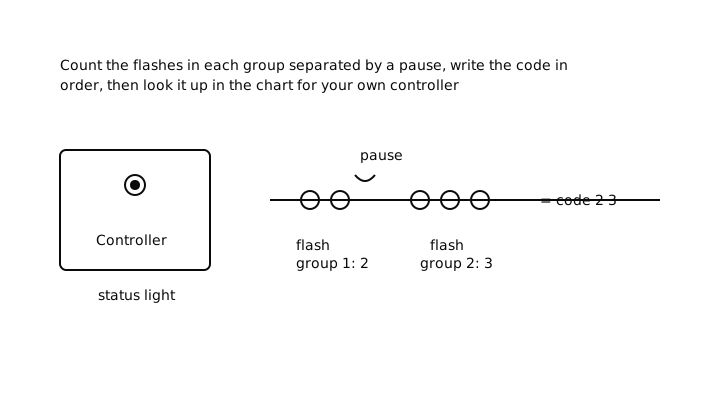
3Count the flashes in each group
A flash code comes in groups separated by a pause. Count the flashes in the first group, note the pause, then count the next group. Repeat until the pattern loops, and write the numbers down in order.
ExpectedA written pattern, for example two flashes then three flashes, that stays the same each time it repeats
4Look the code up for your controller
Match the pattern or number to the chart in your manual for that controller. The same count means different things across brands and models, so use the chart for your system, not a general list.
ExpectedA specific fault from the chart, naming the area at fault such as throttle, contactor, main or motor
Check it worked
5Confirm the area, then move to the fix
Note whether the code points to the throttle, a contactor or main, the motor, or an over-temperature or voltage condition, and go to the matching guide. After repair, clear the code as the manual describes and confirm it does not return on a test drive.
ExpectedA clear area to investigate, and after the repair, a code that stays cleared on a test drive
When to book an engineer
Book an engineer if you cannot find the code chart for your controller, if the code points to the controller itself or the motor and the fault persists after the obvious checks, or if the work to fix it involves programming or live traction voltage you are not confident with. A code narrows the search, but some faults, particularly internal controller or motor faults, need proper test gear to confirm. An engineer can read the code, confirm the fault and repair it in one visit.
Common questions
How do I read a flashing controller code?
Watch the controller status light and count the flashes in each group, separated by pauses, then write the sequence down in order. A pattern such as two flashes, pause, three flashes is a two-digit code. Match that sequence to the chart in the manual for your specific controller to find the fault.
Do all controllers use the same fault codes?
No, and this is the key point. The same flash count or number means different faults on different brands and models, so a code list for one controller does not apply to another. Always use the chart in the manual for your exact controller, or a handheld tool made for it.
Will clearing the code fix the problem?
No. Clearing a code only removes the stored record; if the cause is still there, the code returns as soon as the fault recurs. Read the code, fix the underlying cause in the area it points to, then clear it and confirm on a test drive that it stays cleared.
Why did my code disappear when I disconnected the battery?
Isolating the pack usually clears the controller's stored fault, which is why you should note the code before disconnecting anything. If you have already lost it, power the system back up and recreate the condition that caused the fault so the controller reports the code again.
The light is on steady, not flashing, what does that mean?
A steady light usually means the controller is powered and healthy with no active fault, while a flashing light is signalling a code. Some systems also use a steady light during a specific state such as charging or a walkaway condition, so check what a steady light means for your controller in the manual.
Guided check
Diagnose it step by step
Answer a few questions and we will point you at the most likely cause.
Question 1 of 3
Is it worst pulling away from rest?
Did this fix it?
Every guide is written from manufacturer service documentation and workshop practice, then reviewed before publication. Read how we write and review our repair guides.