Golf buggy lights not working: causes and fixes
Written by the Hawke Electric Vehicles Service Team
Quick answer
Golf buggy lights that will not come on are most often stopped by a blown fuse, a corroded earth connection, or a failed switch, and on electric buggies a dead voltage reducer will take out every 12 volt light at once. Start by checking whether all the lights are dead or just some, because everything dead points to a shared fuse, earth or reducer, while a single dead light points to that bulb or its wiring.
Tools needed
- Digital multimeter
- Test lamp
- Spare fuses
- Small screwdriver set
- Safety glasses
Parts needed
- Replacement fuse of the same rating
- Replacement bulb of the correct type
- Contact cleaner
Confirm the symptom
This guide covers lights that will not switch on at all: headlights, tail lights, or the whole lighting circuit. The single most useful thing to establish first is how many lights are affected, so switch everything on and walk round the buggy.
If every light is dead, the fault is shared: a fuse, the light switch, the main earth, or on an electric buggy the voltage reducer that feeds the 12 volt lighting. If only one light is out, the fault is that bulb, its holder or its own wiring. If the indicators flash but too fast, or the brake lights behave oddly, those are separate faults with their own guides. Come back here for lights that are simply dead.
What causes it
| Cause | How common | How to confirm | Fix |
|---|---|---|---|
| Blown lighting fuse | very common | Find the lighting fuse and continuity-test it | |
| Failed bulb (single light only) | very common | Swap the bulb or test it for continuity | |
| Corroded or loose earth connection | common | Check the light unit earth back to the frame or pack negative | |
| Faulty light switch | common | Test for voltage in and out of the switch as you operate it | |
| Failed voltage reducer (electric buggies, all 12 V lights dead) | occasional | Measure the reducer output, which should be around 12 to 14 V | |
| Broken or chafed wiring in the loom | occasional | Trace the circuit for a break or a damaged section |
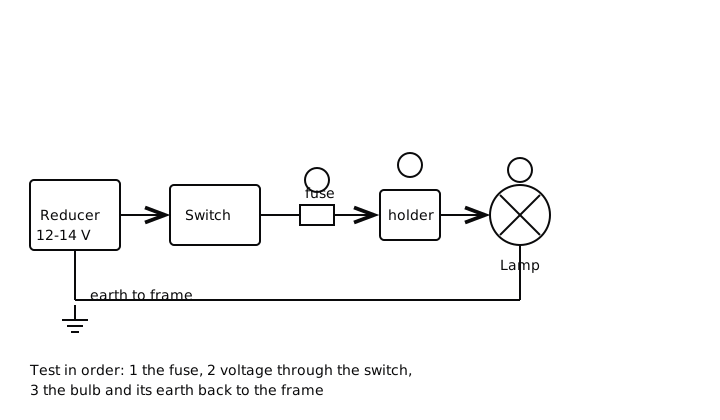
A blown lighting fuse
A blown fuse is the most common reason a whole set of lights goes dead at once, and it is the quickest thing to check. The lighting fuse may sit in a fuse box, in an inline holder near the switch, or with the accessory fuses, and its location varies by model, so check the handbook if it is not obvious.
1Find and test the lighting fuse
Locate the fuse for the lights, remove it and test it on the multimeter continuity or resistance range.
ExpectedA good fuse beeps on continuity or reads near 0 ohms; an open reading means it has blown
Replace a blown fuse only with the same rating printed on the fuse or the holder. If the new fuse blows straight away, there is a short in the lighting circuit and fitting a larger fuse is dangerous; trace the fault instead.
A failed bulb
If only one light is out while the others work, the bulb itself is the first suspect. Filament bulbs fail with age and vibration, and LED units can fail too, though less often.
2Test or swap the bulb
Remove the suspect bulb and either fit a known-good one of the same type or test a filament bulb for continuity across its contacts.
ExpectedA working filament bulb shows continuity; if a known-good bulb lights, the original was the fault
Fit the correct replacement type. If a new bulb still does not light while others do, move on to the earth and wiring for that single light.
A corroded or loose earth
Lights need a good earth to complete the circuit, and a corroded or loose earth is a frequent cause of dim or dead lights, especially at the exposed front and rear of a buggy. A light with power at its feed but a poor earth will not work.
3Check the earth at the light
With the light switched on, set the multimeter to DC volts and measure from the light feed to a clean point on the frame, then from the light earth to the same point.
ExpectedFull supply voltage at the feed but little or none reaching earth means the earth path is broken; clean and remake the earth connection
A faulty light switch
The switch that turns the lights on can fail internally or lose a connection, leaving the lights dead even with a good fuse and good bulbs. This is easy to test by looking for voltage passing through the switch.
4Test voltage in and out of the switch
Set the multimeter to DC volts, back-probe the switch feed with the key on, then the switch output while you operate it.
ExpectedVoltage present on the feed side and appearing on the output when switched on; voltage in but none out means the switch has failed
A failed voltage reducer on electric buggies
Most lights on an electric buggy run at 12 volts, but the pack is 36 or 48 volts, so a voltage reducer steps it down. If the reducer fails, every 12 volt light goes dead together, which is a strong clue when nothing lights and the fuse is good. The reducer testing guide covers this in detail.
5Measure the voltage reducer output
With the key on, set the multimeter to DC volts and read across the reducer output terminals.
ExpectedA working reducer outputs around 12 to 14 V; a reading near 0 V, or full pack voltage, means the reducer or its supply has failed
Broken or chafed wiring
Wiring that has chafed against the frame, corroded at a connector, or broken inside its insulation can cut power to the lights. This is the least common cause and the most time-consuming to find, which is why it sits last. Tracing a loom fault is methodical work with a multimeter, following the circuit from the fuse to the light and testing for voltage along the way.
When to book an engineer
Book an engineer if a replacement fuse blows immediately, if the voltage reducer has failed, or if the fault is a break somewhere in the loom that you cannot trace. Lighting matters for safety if you use the buggy after dark or on shared roads and paths, so it is worth getting right rather than leaving lights intermittent.
Common questions
Why did all my buggy lights stop at once?
Everything going dead together points to a shared part rather than a single bulb. Check the lighting fuse first, then the light switch and the main earth, and on an electric buggy the voltage reducer that feeds all the 12 volt lights. A single dead light, by contrast, is usually just that bulb or its wiring.
What should the voltage reducer put out?
A voltage reducer on an electric buggy steps the 36 or 48 volt pack down to run 12 volt accessories, so its output should read around 12 to 14 V with the key on. A reading near zero, or full pack voltage passing through, means the reducer or its supply has failed and the 12 volt lights will be dead.
Can I fit a bigger fuse if it keeps blowing?
No. A fuse that blows again straight after replacement is protecting the circuit from a short, and fitting a larger fuse removes that protection and risks overheating the wiring or a fire. Trace and fix the short instead, and only ever fit a fuse of the rating printed on the holder.
Are my lights safe to leave not working?
Only if you never use the buggy in poor light or where others need to see you. Working lights are a basic safety item after dark and on shared paths or roads, so a dead lighting circuit is worth fixing promptly rather than driving without it.
Guided check
Diagnose it step by step
Answer a few questions and we will point you at the most likely cause.
Question 1 of 3
Are all the lights and accessories dead, rather than just one?
Did this fix it?
Every guide is written from manufacturer service documentation and workshop practice, then reviewed before publication. Read how we write and review our repair guides.