Golf buggy won't move: causes and fixes
Written by the Hawke Electric Vehicles Service Team
Quick answer
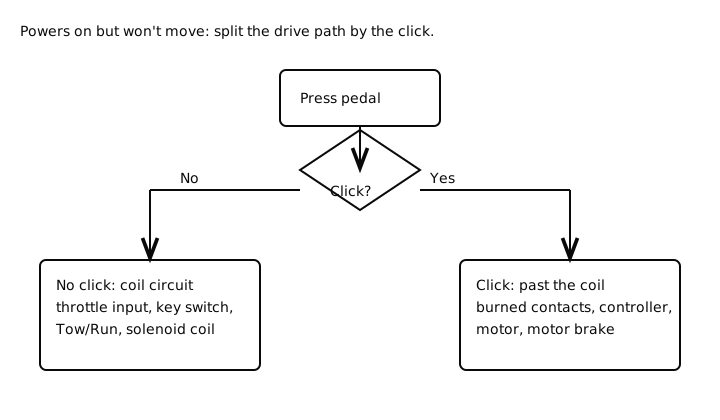
If the dash lights and battery meter work but the buggy will not drive, the power is reaching the controls and the fault is in the drive path. The quickest thing to settle next is whether the solenoid clicks when you press the pedal: a click points at burned contacts, the controller or the motor, while no click points at the throttle input, key switch or solenoid coil. A motor brake or the forward and reverse switch can also block drive on some models.
Tools needed
- Digital multimeter
- Safety glasses
- Insulated gloves
- Work light
Confirm the symptom
This guide is for a golf buggy that switches on normally, with working dash lights and a battery meter reading, but will not move when you press the pedal. Because power is clearly reaching the controls, the fault sits in the drive path between the pedal and the wheels, and one simple observation splits that path in two.
Press the pedal and listen for a click from the solenoid under the seat. If you hear a click, the coil is being energised and the fault is past it, in the contacts, controller or motor: follow Solenoid clicks but no movement. If there is no click at all, the coil circuit is not being completed, and the fault is in the throttle input, key switch, Tow/Run switch or the coil itself: follow No click when pressing the pedal. This guide covers the whole picture and the causes that are not about the solenoid, such as a motor brake or the forward and reverse switch, and it points you to Testing and replacing a solenoid for the meter procedure itself.
1Confirm the buggy really has power
Switch on and check the dash lights, battery meter and any warning indicators, then try both forward and reverse.
ExpectedLights and meter on but no drive in either direction confirms you are on the right guide. If it drives one way only, follow the forward and reverse fault guide instead.
2Listen for the solenoid click
With the Tow/Run switch in Run and the wheels chocked, press the accelerator and listen closely under the seat.
ExpectedA single firm click means the coil works, so concentrate on the contacts and controller. Silence means the coil is not being energised, so concentrate on the throttle input and key switch circuit.
What causes it
| Cause | How common | How to confirm | Fix |
|---|---|---|---|
| Solenoid contacts burned (clicks, no drive) | very common | Voltage-test across the large terminals with the pedal held | Golf buggy solenoid test and replacement |
| Throttle input worn or unplugged (no click) | common | Check the sensor output changes as the pedal moves | |
| Solenoid coil open or not energised (no click) | common | Measure coil resistance across the small terminals | Golf buggy solenoid test and replacement |
| Forward and reverse switch or its micro-switches | occasional | Try both directions; check the switch contacts | |
| Motor brake engaged on models with one | occasional | Listen for a release click at key-on; check for a brake fault | How to reset a golf buggy: step-by-step reset guide |
| Controller output stage or the motor | occasional | Rule out the above, then read controller status where fitted | How to reset a golf buggy: step-by-step reset guide |
Burned solenoid contacts
Burned solenoid contacts are the most common reason a powered-up buggy will not move, and they announce themselves with a healthy click and no drive. The coil pulls the contacts together, but years of arcing pit and coat them, so the large terminals no longer pass current even when the solenoid is closed. This is the click-but-no-drive case, and it is worth confirming with a meter before you replace anything.
3Measure voltage across the large terminals under load
With the wheels chocked and a helper holding the pedal so the solenoid is closed, set the meter to DC volts across the two large terminals.
ExpectedGood contacts drop close to 0 V because current passes freely. Full pack voltage across the closed contacts means they are burned and blocking current, and the solenoid needs replacing.
The full procedure, including the coil test and how to fit a new solenoid safely with the pack isolated, is in Testing and replacing a solenoid. A solenoid that has burned once will often have done so because the contacts were arcing under a heavy or intermittent load, so check the main connections are tight when you fit the new one.
A worn or unplugged throttle input
The throttle input is the sensor that turns pedal position into a signal the controller can act on, and if it fails or comes unplugged the controller never asks for drive, so the solenoid never clicks. On Club Car models this is usually an MCOR sensor, and on E-Z-GO models an inductive throttle sensor, but the principle is the same across brands: no clean signal, no drive.
4Check the throttle signal changes with the pedal
With the meter on the sensor's signal wire, or with the controller's diagnostic display where fitted, watch the reading as you press and release the pedal.
ExpectedA healthy sensor gives a smooth change from rest to full pedal. A dead spot, a jump straight to full, or no change at all points at a worn sensor or a broken connection.
Reseat the connector first, since a throttle plug shaken loose is a common and free fix. If the signal is genuinely faulty, the sensor wants testing and replacing; the throttle input guides for the MCOR and the inductive sensor cover the exact method for each.
A solenoid coil that is not energised
If the solenoid does not click at all, the coil circuit is not being completed. The coil itself can fail open, but more often the fault is upstream in the small-terminal circuit that feeds it: the key switch, the throttle input micro-switch, the Tow/Run switch or a broken wire. This is the no-click case, and it is worth measuring the coil directly before chasing the wiring.
5Measure the coil across the small terminals
With the pack isolated, disconnect the two small coil wires and read resistance across the small terminals.
ExpectedA good coil reads in the tens of ohms, with the exact figure varying by voltage rating. An open reading, or a dead short, means the coil has failed and the solenoid needs replacing.
If the coil is healthy but never sees voltage when the pedal is pressed, the fault is up the coil circuit, and the No click when pressing the pedal guide tests it from the pedal back. Testing and replacing a solenoid covers the coil measurement and replacement in full.
The forward and reverse switch
The forward and reverse switch selects direction, and its contacts or the small direction micro-switches behind it can wear or corrode. The classic sign is drive in one direction only, but a switch that has failed in the middle can leave the buggy dead both ways while everything else looks healthy.
6Try both directions and check the switch
Select forward and try the pedal, then select reverse and try again, noting whether either direction drives.
ExpectedDrive one way only points straight at the direction switch or its micro-switches. No drive in either direction keeps the switch on the list but does not confirm it, so continue down the chain.
Worn direction switches are covered in the forward and reverse fault guide. Clean and reseat the connections first, as corrosion on the small direction contacts is a frequent and simple cause.
A motor brake on models fitted with one
Some buggies use an electric motor brake that locks the motor until the controller releases it at key-on. On E-Z-GO RXV models with a motor brake, a fault in that circuit can hold the brake on, so the buggy has power, the controls respond, but the drive is physically held. It usually comes with beeping or a fault indication rather than silence.
7Listen for the brake release and check for a fault
At key-on, listen for a click or clunk as the motor brake releases, and note any beeping or fault code.
ExpectedNo release click, a dragging feel and a beep point at the motor brake circuit. A clean release with no fault takes the brake off the list.
Motor brake faults on these models are an advanced job because the brake, its wiring and the controller all interact, so if the release is missing this is a point to bring in an engineer rather than force the vehicle.
The controller output or the motor
The controller and the motor come last because they are the least likely and the most involved to test. A controller with a failed output stage, or a motor with worn brushes or an internal fault, can leave a powered buggy unable to move even when the solenoid closes and the throttle signal is clean. A no-drive that survives every check above is where they come into focus.
8Read controller status and check the motor circuit
Note any controller fault code where fitted, and with the pack isolated, check the motor cables and terminals for looseness or burning.
ExpectedA fault code names the area to investigate; a healthy solenoid and clean throttle signal with no drive and no code points at the controller output or the motor. Many controllers also respond to a reset first.
Try a controller reset before condemning it, using the reset procedures guide, because a latched fault can mimic a dead controller. Beyond that, controller and motor diagnosis needs care with stored voltage and heavy current, and is a job for an engineer.
When to book an engineer
Book an engineer if the solenoid contacts test burned and you would rather not replace the unit yourself, if a motor brake will not release, if the fault points at the controller output or the motor, or if the buggy has tried to lurch during testing. These are all sound reasons to hand it over, and diagnosing the drive path in order is far cheaper than replacing a solenoid, a controller and a motor in turn hoping to strike the fault.
Common questions
The lights work but my buggy won't move. Where do I start?
Start by pressing the pedal and listening for a click under the seat. A click means the solenoid coil works and the fault is past it, in the contacts, controller or motor. No click means the coil circuit is not being completed, so the throttle input, key switch and coil come first.
What does it mean if the solenoid clicks but the buggy still won't move?
It means the coil is pulling the contacts together but current is not crossing them, so the contacts are almost certainly burned. Measuring voltage across the two large terminals with the pedal held confirms it: good contacts read near 0 V, burned ones show full pack voltage. The solenoid testing guide covers the check and the replacement.
Can the throttle sensor stop the buggy moving completely?
Yes. If the throttle input fails or unplugs, the controller never receives a request for drive, so it never energises the solenoid and the buggy stays still. Reseat the connector first, then check the signal changes smoothly as the pedal moves.
Why does my buggy only drive in one direction?
Drive in one direction only points at the forward and reverse switch or the small direction micro-switches behind it, where worn or corroded contacts break one side of the circuit. Cleaning and reseating the connections fixes many of these before any part is replaced.
What is the motor brake and why would it stop drive?
Some models use an electric motor brake that locks the motor until the controller releases it at key-on. If that circuit faults, the brake stays on and holds the drive even though the controls respond, usually with beeping. It is an advanced repair for an engineer.
Is it safe to keep pressing the pedal to test it?
Only with the wheels chocked and everyone clear of the path of travel, because the buggy can lurch the instant the fault clears. Set the Tow/Run switch to Tow for any hands-on work beyond meter probing, and keep tools away from the pack terminals.
Did this fix it?
Every guide is written from manufacturer service documentation and workshop practice, then reviewed before publication. Read how we write and review our repair guides.