Golf buggy solenoid test and replacement
Written by the Hawke Electric Vehicles Service Team
Quick answer
A solenoid is tested in two checks: measure coil resistance across the two small terminals, which should read in the tens of ohms, and measure voltage drop across the two large terminals with the solenoid closed under load, which should be close to zero. An open coil or full pack voltage across closed contacts both mean the solenoid has failed. Replacing it is straightforward once the pack is isolated at the Tow/Run switch and the main negative cable is off.
Tools needed
- Digital multimeter
- Insulated wrench for the terminals
- Safety glasses
- Insulated gloves
- Work light
Parts needed
- Replacement solenoid of the matching coil voltage and current rating
Confirm the solenoid is the suspect
Before testing, make sure the solenoid is the right thing to test. A solenoid has two small terminals that feed its coil and two large terminals that carry the main drive current, and it fails in ways that show up as specific symptoms. Matching the symptom to the failure mode first saves you testing a healthy part.
If the solenoid clicks when you press the pedal but the buggy will not move, the coil is working and you want the contact test, because burned contacts are the likely fault; the background is in Solenoid clicks but no movement. If there is no click at all, the coil circuit is not being completed, and you want the coil test plus a trace of the feed circuit covered in No click when pressing the pedal. If the buggy is completely dead with no dash lights, the solenoid is probably not the issue yet, so start with Golf buggy won't start. And if the buggy drives the instant you switch on, before you touch the pedal, stop: that is a welded solenoid stuck closed, a safety-critical fault covered in the solenoid stuck on guide.
1Match the symptom to the terminal group
Decide from the symptom whether you are testing the coil circuit or the contact circuit: no click means the small-terminal coil circuit, a click with no drive means the large-terminal contact circuit.
ExpectedNo click sends you to the coil resistance test across the small terminals. A click with no drive sends you to the voltage-drop test across the large terminals under load.
The failure modes
| Cause | How common | How to confirm | Fix |
|---|---|---|---|
| Coil open circuit (no click) | common | Measure resistance across the two small terminals with the pack isolated | |
| Burned or pitted contacts (clicks, no drive) | very common | Measure voltage drop across the two large terminals under load | |
| Weak return spring or sticking plunger | occasional | Listen for a lazy or missing release; check for drive that will not cut |
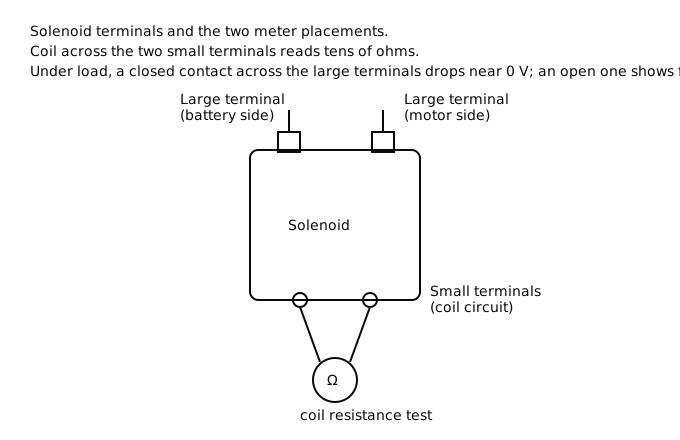
Testing the coil across the small terminals
The coil is the electromagnet that pulls the contacts together, and it lives on the two small terminals. Testing it is a simple resistance measurement made with the pack isolated, and it tells you whether the coil can still work at all. An open coil never clicks, so this is the test to run when the solenoid is silent.
2Measure coil resistance
With the pack isolated at the Tow/Run switch and the main negative cable off, disconnect the two small coil wires and set the meter to the ohms range across the two small terminals.
ExpectedA healthy coil reads in the tens of ohms, with the exact figure varying by the coil's voltage rating, so check your model's specification. An open reading means the coil has failed; a reading of near zero means it has shorted. Either way the solenoid is scrap.
If the coil reads correctly but the solenoid still never clicked in the vehicle, the coil is fine and the fault is in the circuit feeding it, so trace that circuit using No click when pressing the pedal rather than replacing the solenoid.
Testing the contacts across the large terminals
The contacts are the heavy switch inside the solenoid that joins the two large terminals to pass drive current. They can only be judged properly under load, because a solenoid can read fine with a simple continuity check yet still fail to carry the heavy current the motor draws. The voltage-drop test measures exactly that, and it is the definitive check for burned contacts.
3Measure voltage drop under load
With the wheels chocked and a helper holding the pedal so the solenoid is closed, set the meter to DC volts across the two large terminals.
ExpectedGood contacts drop close to 0 V, because they pass current with almost no resistance. A reading of full pack voltage across the closed contacts means they are open or badly burned; a reading of several tenths of a volt or more, with the buggy sluggish, means high-resistance contacts on the way out.
There is no reliable repair for burned contacts, so replace the solenoid if it fails this test. Cleaning the contacts is a short-lived patch that rarely holds, and the arcing that burned them will return.
A weak return spring or sticking plunger
The return spring pulls the contacts apart when you lift off the pedal, and the plunger has to move freely for the solenoid to open and close cleanly. A weak spring or a sticking plunger shows up as a lazy release, a solenoid that buzzes, or, at the dangerous end, contacts that weld and leave the buggy driving with no pedal input. That last case is safety-critical.
4Check the release and listen for buzzing
Press and release the pedal and listen for a clean click in and a clean click out, and confirm drive stops immediately when you lift off.
ExpectedA clean click in and out is healthy. A lazy or missing release, buzzing, or drive that continues after you lift off means the plunger is sticking or the contacts are welding, and the solenoid must be replaced without delay.
If the buggy tries to drive the moment you switch on, treat it as a welded solenoid and isolate the pack straight away; the solenoid stuck on guide covers this safety-critical fault. Do not run the vehicle in this state.
Replacing the solenoid
Replacing a solenoid is a short job once the pack is safely isolated, and the main points are matching the part and keeping the wiring in order. Fit a solenoid with the same coil voltage as the original and a current rating at least equal to it, because an under-rated solenoid will burn its contacts quickly.
5Isolate, swap and reconnect
Set the Tow/Run switch to Tow, disconnect the main negative cable, photograph the wiring, then move the large cables and small coil wires one at a time onto the new solenoid in the same positions.
ExpectedWith the new solenoid fitted, the large terminals nipped to a firm and clean joint and the coil wires back on their small terminals, the buggy should click cleanly and drive when you restore the negative cable and set the switch to Run.
Moving one wire at a time prevents a mix-up, and clean, tight large-terminal joints are what stop the new solenoid burning early. On some solenoids the two small terminals are polarity-sensitive because of an internal diode, so follow the original wiring exactly. If the vehicle uses a suppression diode across the coil, transfer it in the same orientation.
When to book an engineer
Book an engineer if the coil and contacts both test good but the buggy still will not drive, since the fault is then past the solenoid in the controller or motor, or if you find a welded solenoid and are not comfortable isolating the pack to make the vehicle safe. The two solenoid tests are quick and cheap, and getting a clear result on them is what stops a guessed controller or motor replacement.
Common questions
What resistance should a golf buggy solenoid coil read?
A healthy coil reads in the tens of ohms across the two small terminals, with the exact figure set by its voltage rating, so check your model's specification. An open reading means the coil has failed and a near-zero reading means it has shorted. Either result means the solenoid needs replacing.
How do I test the solenoid contacts?
Measure voltage drop across the two large terminals with the solenoid closed under load, which needs a helper on the pedal and the wheels chocked. Good contacts read close to 0 V; full pack voltage across the closed contacts means they are burned. This load test is the only reliable way to judge the contacts.
Can I test a solenoid without removing it?
Yes. Both tests are done in place: the coil resistance test with the small wires disconnected and the pack isolated, and the contact voltage-drop test under load with the pack live. You only remove the solenoid once a test has confirmed it has failed.
Why does the contact test need to be under load?
Burned contacts can still show continuity on a resting meter yet fail to pass the heavy current the motor draws. Testing under load, with the pedal held and current flowing, is what reveals the high resistance that a no-load check misses.
What solenoid do I fit as a replacement?
Match the coil voltage to the original and choose a current rating at least equal to it. An under-rated solenoid burns its contacts quickly. If the original uses a suppression diode across the coil, or is polarity-sensitive on the small terminals, fit the new one the same way.
My buggy drives as soon as I switch on. Is that the solenoid?
Yes, and it is dangerous. Drive without pedal input means the contacts have welded closed, so the solenoid is stuck on. Isolate the pack at the Tow/Run switch and disconnect the main negative cable immediately, and do not run the vehicle until it is replaced.
Did this fix it?
Every guide is written from manufacturer service documentation and workshop practice, then reviewed before publication. Read how we write and review our repair guides.