How to fix a golf buggy flat or slow puncture
Written by the Hawke Electric Vehicles Service Team
Quick answer
Fixing a golf buggy flat or slow puncture starts with finding where the air escapes: the bead where the tyre meets the rim, the valve, or a puncture in the tread. A spray of soapy water shows the leak as bubbles, and the fix follows from the source, whether that is reseating the bead, replacing the valve, or plugging or sealing a tread puncture. It is a moderate job of 30 to 60 minutes with a jack, a pump and a plug or sealant kit.
Tools needed
- Trolley jack
- Axle stands
- Wheel chocks
- Foot or powered pump with a gauge
- Pressure gauge
- Spray bottle of soapy water
- Valve core tool
- Tread plug kit
Parts needed
- Replacement valve core
- Replacement valve stem
- Tread plugs
- Tubeless sealant
- Replacement inner tube where one is fitted
What this fixes
This procedure covers a buggy tyre that is flat, going soft overnight, or losing pressure slowly over a few days. Those symptoms come from one of three places: the bead, where the tyre meets the rim and where dirt, corrosion or a knock breaks the seal; the valve, which leaks through a loose or dirty core or a perished stem; or the tread and sidewall, where a screw, thorn or flint has made a puncture. Finding and fixing the source restores a tyre that holds pressure and rolls true. A repair suits a small tread puncture; a split sidewall, a torn bead or a large hole means a new tyre.
Tools and parts
Parts
- Replacement valve core and, if the stem is perished, a new valve stem
- Tread plugs for a tubeless tyre
- Tubeless sealant for small punctures
- Replacement inner tube, where the tyre runs a tube
You will need a trolley jack, axle stands, wheel chocks, a pump with a gauge, a separate pressure gauge, a spray bottle of soapy water, a valve core tool and a tread plug kit. This is a moderate job that takes 30 to 60 minutes. Set your target pressure from the sidewall of the tyre: buggy tyres typically run somewhere in the region of 15 to 25 psi, but the figure moulded into the sidewall is the one to follow rather than any general range.
How to do it
1Lift the wheel and inflate it
Chock the ground wheels, jack the buggy and lower it onto axle stands, then inflate the soft tyre to its sidewall pressure so there is enough air to reveal the leak.
ExpectedThe wheel is safely off the ground and holding air well enough to find where it escapes
2Find the leak with soapy water
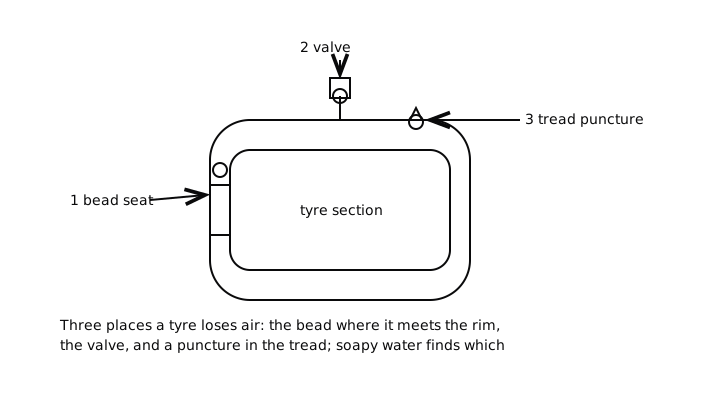
Spray soapy water around the valve, all the way around the bead on both sides of the wheel, and across the tread and sidewall, turning the wheel slowly. Bubbles grow where the air escapes.
ExpectedA clear stream of bubbles pinpoints the source as the valve, the bead or a tread puncture, which decides the repair
3If it is the valve, sort the valve
For a leak at the valve, first nip the core tighter with the valve core tool and retest. If it still leaks, unscrew and replace the core; if the rubber stem is cracked or perished, the stem itself needs replacing, which means breaking the bead.
ExpectedNo more bubbles at the valve once the core is tightened or replaced, or a stem confirmed as the fault
4If it is the bead, reseat and clean it
For a bead leak, deflate the tyre, break the bead, and clean the rim seat and the tyre bead of dirt and corrosion, then refit and reinflate so the bead snaps back onto its seat. A smear of soap on the bead helps it seat.
ExpectedThe bead seats evenly all the way round with an audible seating, and soapy water shows no bubbles along the rim
5If it is a tread puncture, plug or seal it
For a small puncture in the tread, remove the object, ream the hole and insert a plug from the kit, or for a very small hole add tubeless sealant through the valve and drive to spread it. Do not plug a puncture in the sidewall or a hole larger than the kit allows.
ExpectedThe plug sits tight with the tails trimmed, or the sealant stops the leak; soapy water over the repair shows no bubbles
6Set the pressure and refit
Reinflate to the sidewall pressure, checked on a separate gauge, then lower the buggy off the stands.
ExpectedThe tyre reads its correct sidewall pressure and the buggy is back on the ground
Check it worked
7Recheck the pressure after a day
Note the pressure now, then check it again after a day or two of standing.
ExpectedThe pressure holds within a psi or two, which confirms the leak is fixed; a further drop means a second leak or a repair that has not held, so repeat the soapy water test
When to book an engineer
Book an engineer if the leak is in the sidewall, if the bead will not seat or hold, if the tyre is split, buckled or badly perished, or if you do not have the kit to break a bead safely. Sidewall damage cannot be repaired reliably, and a bead that keeps leaking often means a corroded or damaged rim that needs cleaning up or replacing. If the same tyre keeps going flat despite a good repair, there may be a second puncture or a slow rim leak worth a proper tyre machine to find.
Common questions
What pressure should a golf buggy tyre be?
Follow the pressure moulded into the sidewall of your tyre, which is the figure that matters for your vehicle and tyre. As a general guide buggy tyres often sit somewhere around 15 to 25 psi, but read the sidewall rather than relying on that range, and check all the tyres cold.
How do I find a slow puncture?
Inflate the tyre, then spray soapy water around the valve, along the bead on both sides and over the tread and sidewall, turning the wheel as you go. Air escaping anywhere blows bubbles, which shows you at once whether the leak is the valve, the bead or a tread puncture.
Can I plug a golf buggy tyre myself?
A small puncture in the tread can usually be plugged with a plug kit or sealed with tubeless sealant. What you should not plug is a puncture in the sidewall or a hole too large for the kit, because those repairs do not hold and the tyre needs replacing.
Why does my tyre leak at the rim?
A leak at the bead, where the tyre meets the rim, is usually dirt or corrosion on the rim seat breaking the seal, or a bead that did not seat cleanly. Deflating, breaking the bead, cleaning the seat and reseating the tyre fixes most bead leaks; a damaged rim needs replacing.
Is sealant or a plug better for a puncture?
They suit different holes. Sealant works well for very small punctures and weeping leaks and can be added through the valve. A plug is better for a defined hole from a screw or nail. Neither is a substitute for a new tyre once the damage reaches the sidewall or the hole is large.
How long can I drive on a plugged tyre?
A properly fitted plug in the tread can last a long time on a low-speed buggy, but treat it as a repair to monitor rather than forget. Recheck the pressure regularly, and if the plug weeps or the tyre keeps losing air, have the tyre inspected or replaced.
Did this fix it?
Every guide is written from manufacturer service documentation and workshop practice, then reviewed before publication. Read how we write and review our repair guides.