How to set golf buggy toe alignment (DIY)
Written by the Hawke Electric Vehicles Service Team
Quick answer
Setting golf buggy toe alignment at home means measuring the gap across the front of the two front tyres and across the rear of them, then adjusting the tie rods until the front edges sit a small amount closer than the rear edges, which is a slight toe-in. It is a moderate job of 45 to 90 minutes with a straightedge or a length of string, a tape measure and basic spanners, and it cures uneven tyre wear and wandering steering.
Tools needed
- Tape measure
- Straightedge or a length of string
- Chalk or a marker
- Spanners for the tie rod locknuts
- Penetrating oil
- Pressure gauge and pump
- Axle stands where lifting is needed
Parts needed
- Tie rod ends, only if a joint is worn
- Replacement locknuts where seized
What this fixes
Toe alignment is how much the front wheels point inwards or outwards when viewed from above. When it is out, you see it as tyres wearing faster on one edge, feathered tread, steering that wanders or pulls to one side, or a steering wheel that sits off centre when the buggy runs straight. Setting a small, even toe-in restores steady, straight steering and spreads tyre wear evenly. This procedure sets toe on a buggy with adjustable tie rods; it does not fix worn steering joints, bent components or a fault in the rack, which have to be sorted before alignment will hold.
Tools and parts
Parts
- Tie rod ends, only if a joint is found worn during the checks
- Replacement tie rod locknuts, where the originals are seized
You will need a tape measure, a straightedge or a length of string, chalk or a marker, spanners for the tie rod locknuts, penetrating oil, and a pressure gauge and pump to set the tyres first. This is a moderate job of 45 to 90 minutes, and its accuracy comes from careful, repeatable measuring rather than special tools. Your manual gives the target toe figure for your model; where it does not, aim for a small toe-in rather than dead straight or any toe-out.
How to do it
1Prepare the buggy and set the tyres
Park on firm level ground, set all four tyres to their correct sidewall pressure, and check the tie rod ends for play by rocking each front wheel side to side. Roll the buggy forward a couple of metres and let it settle so the suspension and steering find their natural position.
ExpectedCorrect, even tyre pressures, no play in the steering joints, and the buggy settled on level ground
2Centre the steering and mark the tyres
Set the steering straight ahead with the steering wheel centred. Using chalk, mark a point at spindle height on the front face of each front tyre, then measure and mark the matching point on the rear face at the same height, so front and rear measurements are taken at the same spots on the tyre.
ExpectedA matched pair of marks front and rear on each tyre, all at the same height, so the two measurements compare like with like
3Measure across the front and the rear of the tyres
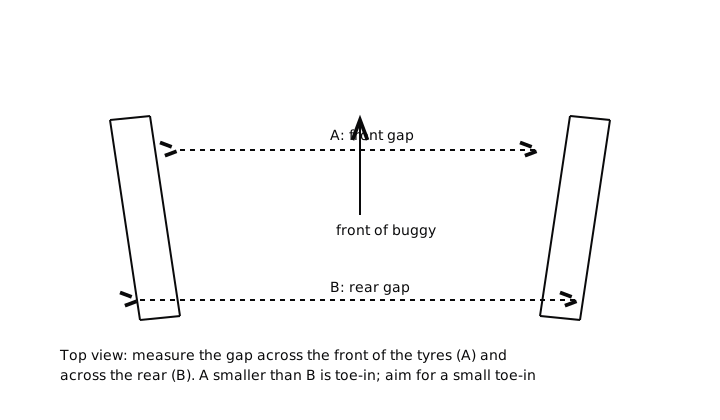
With the string or straightedge and tape, measure the distance between the marks across the front of the two front tyres, then across the rear of them. Take each measurement at the same height off the ground.
ExpectedTwo figures: the gap across the front edges and the gap across the rear edges of the tyres
4Read the toe from the two figures
Compare the numbers. If the front gap is smaller than the rear gap, the wheels toe in; if it is larger, they toe out; if they are equal, toe is zero. You are aiming for a small toe-in, so the front figure should be a little smaller than the rear.
ExpectedA clear reading of toe-in, toe-out or zero, and how far it is from the small toe-in you want or the figure in your manual
5Adjust the tie rods
Loosen the tie rod locknuts, then turn the tie rod adjusters to change the length and bring the front figure to a little under the rear. Adjust both sides evenly so the steering wheel stays centred, turning in small amounts and remeasuring between adjustments.
ExpectedThe front measurement comes down to a small toe-in relative to the rear, with equal adjustment on each side
6Lock off and settle
Hold each adjuster still and tighten its locknut, then roll the buggy forward and back and let it settle again to remove any bias you introduced while measuring.
ExpectedThe locknuts are tight, the adjusters have not moved, and the buggy has resettled on its suspension
Check it worked
7Remeasure and test drive
Take the front and rear measurements again after settling, confirm the small toe-in has held, then drive a short straight stretch with a light grip on the wheel.
ExpectedThe toe reading is still a small toe-in, the buggy tracks straight without wandering or pulling, and the steering wheel sits centred; if it pulls or the wheel is off centre, recheck the measurements and the side-to-side balance
When to book an engineer
Book an engineer if you find play in a tie rod end or steering joint, if a locknut or adjuster is seized, if the buggy still wanders or wears tyres unevenly after a correct toe setting, or if a component looks bent. Toe is only one part of alignment, and steering that pulls after a good toe setting can point to a bent axle, a suspension fault or a difference between the two sides that needs proper alignment equipment. Setting toe around a worn joint never holds, so worn parts come first.
Common questions
What is toe on a golf buggy?
Toe is how much the front wheels point inwards or outwards seen from above. Wheels closer together at the front than the rear are toed in; closer at the rear are toed out; equal is zero toe. A small toe-in is the usual target because it keeps the steering steady and tyre wear even.
How much toe-in should I set?
Use the figure in your manual where there is one. Where there is not, aim for a small toe-in, so the front of the tyres sits just closer together than the rear, rather than setting the wheels dead straight or with any toe-out. Small and even is the aim, measured the same way each time.
Can I really align a buggy with string?
For toe, yes. Toe is a comparison of two measurements, the gap across the front of the tyres and the gap across the rear, so a straightedge or string and a tape measure are enough if you measure carefully at the same height and points. Camber and caster need more, but toe is the setting that drives most tyre wear.
Why do my front tyres wear on one edge?
Uneven edge wear on the front tyres is a classic sign of incorrect toe. Too much toe-in or toe-out scrubs the tyre sideways as it rolls, wearing one edge faster. Setting a small, even toe-in usually cures it, provided the steering joints are not worn.
Should I check tyre pressures first?
Yes, always set the tyres to their correct sidewall pressure before measuring toe. A soft tyre changes shape and height and throws the measurement off, and uneven pressures pull the buggy to one side, which can look like an alignment fault when it is not.
Why is my steering wheel off centre after I set the toe?
An off-centre steering wheel after a toe adjustment usually means one tie rod was turned more than the other. Adjust both sides evenly to keep the wheel centred while holding the same total toe, turning a little on each side and remeasuring until the toe is right and the wheel sits straight.
Did this fix it?
Every guide is written from manufacturer service documentation and workshop practice, then reviewed before publication. Read how we write and review our repair guides.