How to replace a golf buggy brake cable
Written by the Hawke Electric Vehicles Service Team
Quick answer
You replace a golf buggy brake cable by releasing the cable tension, unhooking it at the pedal or equaliser end and at the brake lever, routing the matching new cable along the same path, then setting the free-play and adjusting the drums so both sides brake evenly. It cures a long pedal or a park brake that will not hold caused by a stretched or seized cable. The job needs basic hand tools and about one to two hours.
Tools needed
- Trolley jack and axle stands
- Wheel chocks
- Spanner and socket set
- Pliers
- Penetrating oil
- Cable ties
- Work light
- Safety glasses
Parts needed
- Brake cable, matched to your model by length and end fittings
- Clevis pins, clips or split pins for the cable ends
- Cable ties to match the original routing
What this fixes
This procedure replaces a brake cable that has stretched, frayed or seized in its outer sleeve. A stretched cable gives a long pedal that adjustment can no longer fully recover and a park brake that will not hold on a slope. A seized cable, where the inner wire has rusted to the outer, makes the brake on that side drag, apply slowly, or fail to release, which shows up as a pull to one side or a wheel that stays warm. Fitting a new, free-running cable restores a firm pedal and even braking.
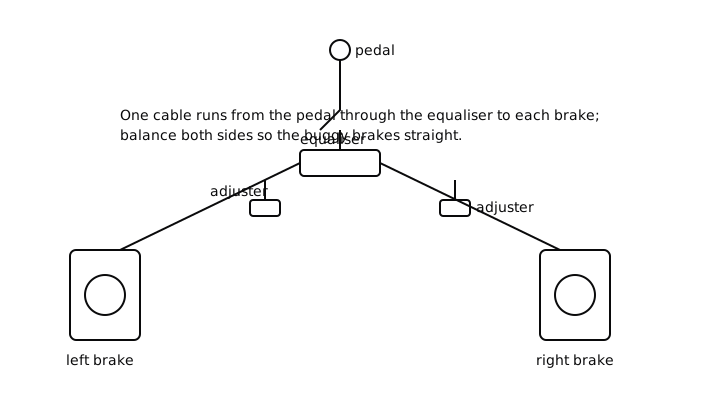
It also addresses a cable that is visibly frayed or kinked, which is a failure waiting to happen: a cable strand by strand losing its grip will eventually let go, and on a brake that is not something to leave. Replacing it returns the brake to full, reliable operation. Because the two sides work together through the equaliser, the job finishes with both drums adjusted to match so the buggy brakes straight.
Tools and parts
Parts
- Brake cable matched to your model by length and end fittings
- Clevis pins, clips or split pins for the cable ends
- Cable ties to reproduce the original routing
You need a jack and axle stands, wheel chocks, a spanner and socket set, pliers, penetrating oil to free rusted fasteners, and cable ties. Add safety glasses and a work light. This is an advanced job, not because any single step is hard but because the cable routing and the final balancing between both sides need care to get right, and it is safety work. Allow one to two hours, and photograph the routing before you remove the old cable so the new one goes back the same way.
How to do it
1Chock, lift and support the buggy
Set the drive to Tow, remove the key, chock the grounded wheels, then jack and support the buggy on axle stands so you can reach both the pedal or equaliser end and the brake ends of the cable.
ExpectedThe buggy is stable on stands with clear access to the cable run; you should be able to see the full path of the cable from the pedal or equaliser to each brake
2Photograph the routing and release the tension
Photograph how the cable is routed and secured, then slacken the brake adjusters and any cable adjuster to remove all tension before you unhook anything.
ExpectedThe cable goes slack with no load on it; releasing the tension first is what lets the ends come apart without fighting spring pressure, and your photos record the exact path
3Unhook both ends of the old cable
Free the cable at the brake lever end by removing its clevis pin, clip or split pin, then release it at the pedal or equaliser end, and pull the inner wire out of its outer sleeve or the whole cable free.
ExpectedThe old cable comes away complete; note how the end fittings and any return spring sit, and keep the old cable to compare length and fittings against the new one
4Compare the new cable and route it the same way
Lay the new cable against the old one to confirm the length and end fittings match, then feed it along the identical path, through the same guides and clips, keeping it clear of hot and moving parts.
ExpectedThe new cable matches the old for length and ends and follows the same route; a cable that is the wrong length or takes a different path will bind or pull unevenly and must be corrected now, not compensated for at the adjuster
5Connect both ends and secure the run
Hook the new cable to the brake lever and to the pedal or equaliser with fresh pins and clips, refit any return spring, and tie the cable at the original points so it cannot sag, snag or rub.
ExpectedBoth ends are pinned and secured and the run is tied as the original was; nothing should be able to catch the cable as the suspension or brake moves through its travel
6Set the free-play and adjust both drums
Take up the slack at the cable adjuster so the pedal has a small amount of free-play before it bites, then adjust each drum to a light, even drag and match the two sides through the equaliser.
ExpectedThe pedal has a little free-play then a firm bite, and both wheels show the same light drag; if one wheel bites before the other, rebalance at the equaliser until the buggy will brake straight
Check it worked
7Test the pedal and park brake, then road-test gently
Refit the wheels, lower the buggy, and check the foot pedal feels firm and the park brake holds on a slope. Then drive gently on the flat and brake from walking pace, watching for any pull.
ExpectedThe pedal is firm with a little free-play, the park brake holds, and the buggy pulls up straight; a cable that still stretches noticeably in the first days can need one follow-up adjustment as it settles, which is normal for a new cable
When to book an engineer
Book an engineer if the correct new cable will not give a firm pedal, if the buggy still pulls to one side once both sides are balanced, if fasteners are seized or corroded so badly that removal risks damage, or if you are unsure the routing is safe. A brake cable that binds, chafes or is set unevenly undermines the whole brake, so if the result is not clearly right, have it checked rather than driven.
Common questions
How do I know the cable is the problem and not just adjustment?
If the pedal stays long after a correct drum adjustment, or the park brake will not hold, suspect a stretched cable. If one brake drags, applies slowly or will not release, the cable on that side has likely seized in its outer sleeve. A frayed or kinked cable you can see should be replaced regardless.
Can I free a seized cable instead of replacing it?
Sometimes penetrating oil frees a lightly stuck cable, but a cable that has rusted enough to seize has usually lost strength and will seize again. On a brake, a cable that is fraying or rust-bound is safer replaced than nursed, so treat freeing it as no more than a temporary measure.
Does the new cable have to be the exact part?
It needs to match your model for length and end fittings. A cable that is too long or short, or has the wrong ends, will bind or pull unevenly and cannot be corrected properly at the adjuster. Compare the new cable against the old one before fitting to confirm they match.
Why does the buggy pull to one side after fitting a cable?
Usually the two sides are not balanced through the equaliser, so one brake bites first. Set each drum to the same light drag and even up the tension at the equaliser. If it still pulls, check the new cable is not binding on one side and the shoes are not contaminated.
Do I need to re-adjust a new cable later?
Often yes. A new cable can stretch a little as it beds in over the first days of use, lengthening the pedal slightly. One follow-up adjustment usually settles it, after which it should stay put. Recheck the pedal and park brake after the first week.
How much free-play should the pedal have?
A small amount, so the pedal moves a little before the brakes start to bite and the shoes are not held against the drums at rest. Set it at the cable adjuster after the drums are adjusted. Too much free-play gives a long pedal; none at all leaves the brakes dragging.
Did this fix it?
Every guide is written from manufacturer service documentation and workshop practice, then reviewed before publication. Read how we write and review our repair guides.