How to test golf buggy batteries and find the bad one
Written by the Hawke Electric Vehicles Service Team
Quick answer
A pack is only as strong as its weakest battery, and the way to find the bad one is to read every battery twice: once rested and once under load. Rested, the failed unit may look almost normal, but under load its voltage sags far more than its neighbours. Take both sets of readings in order, and the battery that drops hardest under load is the one to replace.
Tools needed
- Digital multimeter
- Hydrometer
- Wheel chocks
- Support stands
- Safety glasses
- Insulated gloves
- Work light
Confirm the symptom
This guide is for a pack that tests low or leaves the buggy sluggish, where you suspect one battery rather than a worn-out set. It is the diagnosis behind several other symptoms: a charger that clicks and quits, a range that has halved, or a buggy that fades under load can all trace back to a single failed battery dragging the pack down.
If the whole pack is old and every battery reads low together, you are more likely looking at end-of-life across the set than a single failure; the guide on how long batteries last covers that decision. If the buggy will not charge at all, start with Golf buggy not charging. If the range has dropped but you have not yet isolated a battery, Golf buggy battery draining fast leads you here. This guide is the isolation step itself.
1Start from a known state of charge
Charge the pack fully, then let it rest off the charger for a few hours so the surface charge settles and the readings mean something.
ExpectedA rested, fully charged pack reads about 38.2 V on a 36 V system and about 50.9 V on a 48 V system, which is where the individual readings below should add up from
What makes one battery the bad one
| Cause | How common | How to confirm | Fix |
|---|---|---|---|
| A shorted or dropped cell inside one battery | very common | That battery reads low rested and sags hardest under load | How to test golf buggy batteries with a multimeter |
| Sulfation from undercharging or long storage | very common | Low specific gravity and a battery that will not hold charge | |
| A dry cell from low electrolyte | common | Plates exposed in one cell; top up and recheck | |
| Internal age and plate shedding | common | Weak load performance across an older battery with no obvious cell fault | |
| A corroded interconnect faking a bad battery | occasional | Measure across the posts, then across the link; a hot link is the fault, not the battery |
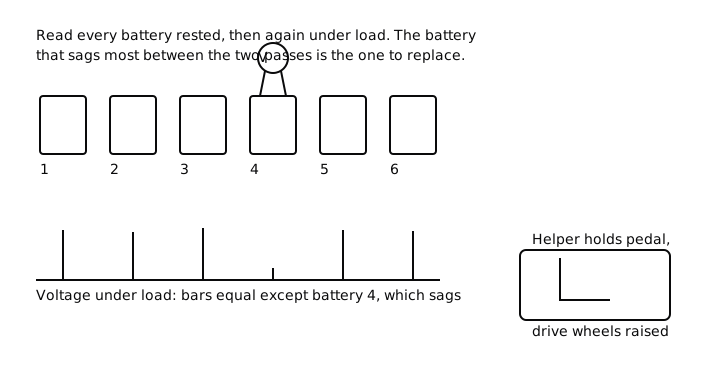
Read every battery at rest first
The rested reading is your baseline. A fully charged lead-acid cell rests at about 2.12 volts, so a healthy 6 volt battery reads about 6.3 to 6.4 volts, an 8 volt battery about 8.4 to 8.5 volts and a 12 volt battery about 12.6 to 12.7 volts. Reading every battery at rest, in order, tells you whether one is already down before any load is applied.
2Measure each battery in order
With the charger unplugged and the pack rested, set the multimeter to DC volts and read across the posts of every battery from one end of the pack to the other, writing each value against its position.
ExpectedHealthy batteries read within about 0.1 to 0.2 V of each other at their nominal figure. A battery already sitting a few tenths, or a whole volt, below the rest is your first suspect, but the rested reading alone is not proof
A failed battery does not always show itself at rest, because a weak or partly shorted battery can hold a static voltage that looks close to normal. That is why the rested pass narrows the field but the load pass names the culprit. Keep your written list in pack order so you can line the two passes up side by side.
Read every battery again under load
The under-load reading is the definitive test, because a battery only reveals a weak cell when it has to deliver current. Put the pack under load and each healthy battery holds most of its voltage, while the failed one sags far below the others. This is the single most useful measurement for finding a bad battery, and it is why measuring the whole pack alone so often misses the fault.
3Load the pack and read each battery as it works
With the drive wheels raised on stands and the buggy in Run, have a helper hold the pedal so the motor turns the wheels and draws current, while you read across each battery in the same order as before. Take each reading within the first several seconds of load.
ExpectedHealthy batteries hold within a few tenths of each other under load; the failed unit sags noticeably further, for example a 6 V battery dropping toward 5 V or below while its neighbours stay above 6 V. The battery that drops hardest under load is the bad one
If you cannot safely raise the wheels, an alternative is to read each battery immediately after driving the buggy up a gentle slope or against a short, firm push on the pedal on the level, catching the readings while the pack is still working. The principle is the same: load the pack and watch which battery collapses. Compare the rested list with the loaded list, and the battery with the biggest drop between the two is the one to replace.
Cross-check with a hydrometer where you can
On flooded batteries with removable filler caps, a hydrometer confirms the voltmeter by reading the specific gravity of the electrolyte in each cell, which tracks the true state of charge more directly than voltage. A single cell reading far below the others in the same battery is a clear sign of a failed cell.
4Read specific gravity cell by cell
With the pack rested and the electrolyte at the correct level, draw electrolyte into the hydrometer from each cell in turn and note the reading.
ExpectedA fully charged cell reads around 1.265 to 1.275 specific gravity; a cell sitting well below the others, or below about 1.20 when the rest are full, marks a failed or badly sulfated cell in that battery
Sealed or maintenance-free batteries cannot be checked with a hydrometer, so on those the load test is your main tool, backed up by the load-testing guide for a more formal capacity check. Never remove filler caps or draw electrolyte without eye protection, and keep the samples away from skin and clothing.
Rule out a bad connection before condemning a battery
A corroded or loose interconnect between two batteries can mimic a failed battery, because the resistance in the link drops voltage under load just as a weak cell does. Before you buy a replacement, prove that the fault is in the battery and not in the connection to it.
5Measure across the link as well as the battery
Under the same load, read across the posts of the suspect battery, then move one probe and read across the interconnect strap between it and the next battery.
ExpectedA meaningful voltage drop across the strap itself, or a strap that feels warm after load, means the connection is the fault; clean and tighten it and retest before replacing any battery
Once a clean, tight connection is confirmed and the battery still sags under load, you have found the failed unit. On a young pack, replace it with a matched battery of the same make, age and rating where possible; on an old pack, expect the rest to be close behind and consider a full matched set, as covered in the guides on replacing one battery and how long batteries last.
When to book an engineer
Book an engineer if you cannot raise the buggy safely to load the pack, if the readings are inconsistent between passes, or if more than one battery is sagging and you would rather have a proper capacity test before spending on replacements. An engineer can load-test every battery to a repeatable standard and tell you exactly which units are done, which is quicker and cheaper than replacing on a guess.
Common questions
What should each battery read when fully charged and rested?
A fully charged lead-acid cell rests at about 2.12 V, so a 6 V battery reads about 6.3 to 6.4 V, an 8 V battery about 8.4 to 8.5 V and a 12 V battery about 12.6 to 12.7 V. Read them a few hours after charging so the surface charge has settled.
Why do I need to test under load and not just at rest?
A weak or partly shorted battery can hold a nearly normal voltage at rest and only collapse when it has to deliver current. The under-load reading is the definitive test: load the pack and the failed battery sags far below the others, which a rested reading alone can miss.
How do I put the pack under load safely?
Raise the drive wheels on stands rated for the weight, chock the wheels on the ground, put the buggy in Run and have a helper hold the pedal so the motor draws current while you read each battery. Keep hands, clothing and meter leads clear of the turning wheels, and never rely on the jack alone.
How much of a drop marks a bad battery?
Healthy batteries stay within a few tenths of a volt of each other under load. A unit that sags a whole volt or more below its neighbours, for example a 6 V battery dropping toward 5 V while the others hold above 6 V, is the failed one. The biggest drop between the rested and loaded readings names the culprit.
Can a bad connection look like a bad battery?
Yes. A corroded or loose interconnect drops voltage under load just as a weak cell does. Before condemning a battery, measure across the strap between it and the next battery under load; a drop across the strap, or a warm strap, means the connection is the fault, so clean and tighten it and retest.
Should I replace only the bad battery?
On a young pack, replacing the single failed unit with a matched battery can be reasonable. On an old pack, the others are usually close behind, and a new battery is dragged down to their level, so a full matched set is often the sounder spend. The guide on replacing one battery covers the trade-off.
Did this fix it?
Every guide is written from manufacturer service documentation and workshop practice, then reviewed before publication. Read how we write and review our repair guides.