Golf buggy not charging: causes and fixes
Written by the Hawke Electric Vehicles Service Team
Quick answer
A golf buggy that will not charge at all is most often caused by a pack too flat for the charger to detect, a dead mains socket, or a blown charger fuse. Start by measuring pack voltage at the battery terminals with a multimeter. If the pack reads far below its nominal voltage, the charger is probably refusing to start rather than failing.
Tools needed
- Digital multimeter
- Safety glasses
- Insulated gloves
- Work light
Parts needed
- Replacement charger fuse, rating as printed on the charger label
Confirm the symptom
This guide covers a charger that does nothing at all when plugged into the buggy: no lights, no fan, no hum, no click and no movement on the state-of-charge meter. That silence matters, because it points to a different set of causes than a charger that starts and then stops.
If your charger clicks once or cycles click-clack before going quiet, read the guide Charger clicks but won't charge instead. If the charger shows no lights even when it is connected to a socket you know works and unplugged from the buggy, the fault is on the supply side of the charger; see Charger has no lights or power. If the buggy charges but the batteries run down quickly afterwards, the pack is accepting charge and the guide you want is Golf buggy battery draining fast.
1Try the charger on a socket you know works
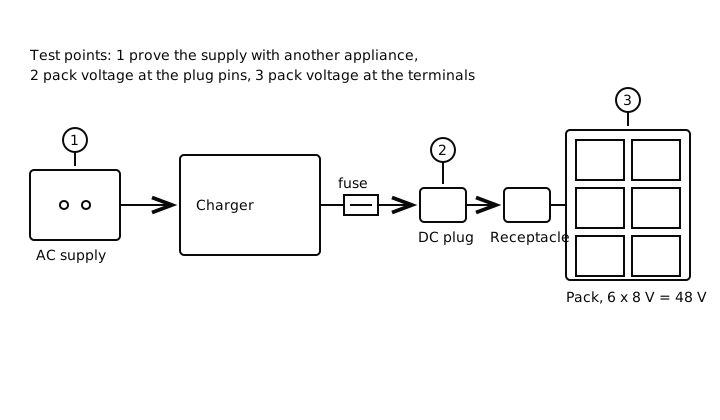
Plug the charger into a socket that is currently running another appliance, then connect it to the buggy. This rules out the most common non-fault, a dead socket or tripped circuit, before you touch a meter.
ExpectedAny sign of life at all, a light, a fan, a click, means the charger has supply and the problem is between the charger and the pack
2Check whether pack voltage moves when the charger is connected
Set a multimeter to DC volts, read the pack across its outermost terminals, then connect the charger and watch the reading for a minute.
ExpectedA charging pack rises by a volt or more within a minute; a completely static reading confirms no charge is flowing
What causes it
| Cause | How common | How to confirm | Fix |
|---|---|---|---|
| Pack voltage below the charger's wake threshold | very common | Measure pack voltage at the battery terminals and compare with nominal | How to test golf buggy batteries with a multimeter |
| Dead mains socket or tripped RCD | very common | Run another appliance from the same socket; check the consumer unit | |
| Blown charger fuse | common | Locate the fuse and continuity-test it with a multimeter | |
| Damaged charging lead, plug or receptacle | common | Inspect the pins for burning; compare voltage at the plug pins with the terminals | |
| Charge control fault on Club Car models with an OBC | occasional | Charger works on another vehicle; pack voltage healthy; relay never signalled | |
| Failed charger | occasional | Rule out all of the above, then test the charger on a known-good vehicle |
Pack voltage below the charger wake threshold
Automatic golf buggy chargers do not switch on blindly. Before delivering current, the charger looks for battery voltage at the plug, and if the pack has been run flat or left to self-discharge over winter, the voltage it sees can sit below the minimum the charger needs to wake up. The charger then does nothing, which owners understandably read as a failed charger. The wake threshold varies by charger family: many 36 volt chargers want to see somewhere above roughly 20 to 28 volts, and many 48 volt chargers somewhere above roughly 28 to 38 volts. The exact figure is in the charger manual or on its label, so treat these as working ranges rather than fixed numbers.
3Measure the pack at the battery terminals
With the charger unplugged, set the multimeter to DC volts and read across the whole pack, from the most positive terminal to the most negative.
ExpectedA healthy rested 36 V pack reads about 38.2 V full and roughly 36.5 V at half charge; a 48 V pack reads about 50.9 V full and roughly 48.7 V at half charge. A pack reading far below nominal, for example under 30 V on a 48 V system, is usually below the charger's wake threshold
4Measure each battery individually
Read across the posts of every battery in the pack and note the values in order. Full rested voltage tables and the measuring method are in the guide on testing batteries with a multimeter.
ExpectedRested and fully charged: a 6 V battery reads 6.3 to 6.4 V, an 8 V battery 8.4 to 8.5 V and a 12 V battery 12.6 to 12.7 V. One battery reading a volt or more below its siblings points to a failed unit dragging the pack down; see Finding the one bad battery in a pack
The fix depends on how far down the pack is. A pack that is merely deeply discharged can be recovered by lifting its voltage above the wake threshold: charge each battery individually with a small charger of the matching voltage, under supervision and in a ventilated space, until the pack total clears the threshold and the automatic charger takes over. Before any recovery charge, check the electrolyte covers the plates in every cell and top up with distilled water if it does not; the battery watering guide covers how and when. If one battery will not come up or falls straight back down, it has likely failed internally and recovery charging will not hold.
No power at the mains socket
A dead socket is the least glamorous cause of a buggy not charging and one of the most frequent. Garage and outbuilding sockets often share a circuit with an RCD that trips silently, and extension leads add their own failure points.
5Prove the socket with another appliance
Plug a lamp or similar appliance into the exact socket the charger uses, including any extension lead in the chain. If the appliance is dead too, check the consumer unit for a tripped RCD or breaker and reset it once.
ExpectedThe appliance runs; if it does not, the supply circuit is the fault, not the charger or the buggy
If the RCD trips again as soon as the charger is plugged in, stop and treat the charger as suspect: a charger that trips the supply has an internal fault and needs repair or replacement, not repeated resetting.
A blown charger fuse
Most buggy chargers carry at least one fuse, and its location varies by model: some use an external fuse holder on the case, some an inline fuse on the DC output lead, and some blade fuses on the internal board. Only test fuses you can reach without opening the charger case.
6Continuity-test the accessible fuse
Unplug the charger from the mains and the buggy, remove the fuse from its holder and test it on the multimeter's continuity or resistance range.
ExpectedA good fuse beeps on continuity or reads near 0 ohms; an open reading means it has blown
Replace a blown fuse only with the same type and rating printed on the charger label or the fuse holder. If the new fuse blows immediately, do not fit a larger one; something downstream is drawing too much current and the charger needs professional attention.
A damaged charging lead, plug or receptacle
The DC plug and the receptacle on the buggy carry the full charging current, and worn or burned contacts are a common failure point. Inspect the plug pins and the receptacle contacts for pitting, discolouration, melted plastic or a plug that wobbles in its socket.
7Compare voltage at the plug pins with the pack terminals
With the charger unplugged from the mains, read the DC voltage across the pins inside the buggy's receptacle, then read across the pack terminals.
ExpectedThe two readings should match within about 0.1 to 0.2 V. Pack voltage at the terminals but little or nothing at the receptacle pins means a break in the receptacle wiring, its fuse where fitted, or the receptacle itself
Burned receptacle contacts get worse quickly because resistance creates heat and heat creates more resistance. If the receptacle is damaged, the charging port faults guide covers replacement in detail.
Charge control faults on Club Car models
On Club Car buggies fitted with an onboard computer, the OBC controls the charge circuit: the charger only starts when the OBC completes the circuit. If the OBC does not signal, a healthy charger and a healthy pack will still sit silent. A quick, widely used reset is to turn the Tow/Run switch to Tow, disconnect the main negative battery cable for a few minutes, reconnect it and switch back to Run before plugging the charger in again.
If the reset does not help and the same charger works on another vehicle, OBC diagnosis is a job for an engineer, because the fault could sit in the OBC itself, its wiring, or the charge relay it drives.
A failed charger
A genuinely failed charger is less common than the causes above, which is why it sits last in the table. Be careful with the obvious-seeming test: most automatic chargers give no output at all until they detect a battery, so measuring the DC plug on the bench and finding 0 volts does not prove the charger is dead.
8Test the charger on a known-good vehicle
If you have access to another buggy with the same pack voltage and plug type, connect the suspect charger to it.
ExpectedIf the charger starts normally on the other vehicle, your charger is fine and the fault is on your buggy; if it stays silent on both, the charger has failed
Do not open the case to investigate further. Charger capacitors store enough energy to give a serious shock well after the mains lead is pulled, and internal repair is engineer work.
When to book an engineer
Book an engineer if the pack is below the wake threshold and you are not comfortable running a supervised recovery charge, if a replacement fuse blows straight away, if the receptacle contacts are burned, if a Club Car OBC reset does not restore charging, or if the checks point to the charger internals. These are all routine diagnoses with the right equipment, and guessing at parts, a new charger first, then new batteries, is the expensive way to find the answer.
Common questions
What voltage does my pack need for the charger to start?
It varies by charger family: many 36 V chargers need the pack above roughly 20 to 28 V, and many 48 V chargers above roughly 28 to 38 V. The exact wake threshold is in your charger manual. A pack at or near its nominal voltage will always be seen.
What should a fully charged pack read when rested?
About 38.2 V for a 36 V pack and about 50.9 V for a 48 V pack, measured after the pack has rested for a few hours off the charger. Per battery, that is 6.3 to 6.4 V for 6 V units, 8.4 to 8.5 V for 8 V units and 12.6 to 12.7 V for 12 V units.
Can I wake a flat pack with a car battery charger?
Only battery by battery, and only with care. A basic 12 V charger suits 12 V batteries; 6 V and 8 V batteries need a charger with a matching setting. Charge each unit under supervision in a ventilated space just long enough to lift the pack above the wake threshold, then let the proper charger finish the job.
How long should a full charge take?
A deeply discharged lead-acid pack typically needs 6 to 10 hours on its matched automatic charger. Time varies with pack size, charger output and battery age, so treat anything in that band as normal and investigate cycles that finish in under an hour.
Why does my charger not even click?
No click at all usually means the charger has no mains supply, its fuse has blown, or the pack is below the wake voltage so the charger never attempts to start. A click followed by silence is a different fault path, covered in the charger clicking guide.
Will a new charger fix a buggy that will not charge?
Only if the charger is actually the fault, and it is the least likely of the common causes. Measure the pack and prove the socket, fuse and receptacle first; most no-charge cases are resolved on the vehicle side without touching the charger.
Did this fix it?
Every guide is written from manufacturer service documentation and workshop practice, then reviewed before publication. Read how we write and review our repair guides.