Golf buggy charger not working: no power or lights
Written by the Hawke Electric Vehicles Service Team
Quick answer
A golf buggy charger that shows no lights and no signs of life is most often on a dead socket, has a blown fuse, or has a damaged mains lead. Before condemning it, connect it to the buggy, because many automatic chargers stay dark until they sense the pack. Prove the socket with another appliance, then check the charger's fuse.
Tools needed
- Digital multimeter
- Safety glasses
- Work light
Parts needed
- Replacement charger fuse, rating as printed on the charger label
- Replacement mains lead if a detachable type
Confirm the symptom
This guide is for a charger that appears completely dead: no lights on the case, no fan, no hum and no warmth, whether or not it is connected to the buggy. That points to the supply side of the charger, the mains socket, the lead, the fuse and the charger's own power section, rather than anything in the battery pack.
There is one trap to clear first. Many automatic chargers show no lights at all on the bench and only wake when they sense battery voltage at the output, so a charger that is dark unplugged from the buggy may be perfectly healthy. If the charger clicks, hums or lights once it is connected to the buggy but still will not charge, you are on the wrong guide; read Golf buggy charger clicks but won't charge. If the charger lights and charges but the pack then runs down quickly, see Golf buggy battery draining fast.
1Connect the charger to the buggy before judging it
Plug the charger into a socket you know works, then connect it to the buggy and watch for any light, fan or hum that was absent on the bench.
ExpectedThe charger comes to life once it sees the pack: it was behaving normally and any earlier silence was the auto-detect feature, not a fault
2Prove the socket with another appliance
Plug a lamp or similar appliance into the exact socket the charger uses, including any extension lead in the chain.
ExpectedThe appliance runs; if it is dead too, the supply circuit is the fault, not the charger
What causes it
| Cause | How common | How to confirm | Fix |
|---|---|---|---|
| Dead mains socket or tripped RCD | very common | Run another appliance from the same socket; check the consumer unit | |
| Blown charger fuse | very common | Locate the fuse and continuity-test it with a multimeter | How to test golf buggy batteries with a multimeter |
| Damaged mains lead, plug or plug fuse | common | Inspect the lead and plug; test or swap the plug fuse | |
| Charger not woken because it only lights on a connected pack | common | Connect the charger to the buggy and watch for lights or a hum | |
| Failed internal power section on the charger board | occasional | Supply, fuse and lead all proven good, yet the charger stays dead |
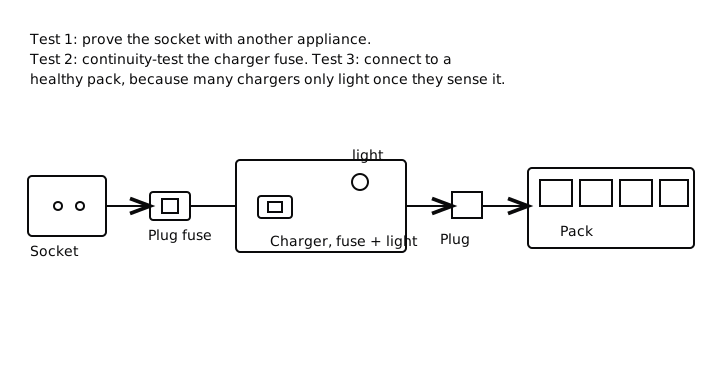
A dead mains socket or tripped RCD
A dead socket is the most frequent reason a charger looks broken and one of the easiest to overlook. Garage and outbuilding sockets often share a circuit with an RCD that can trip silently, and extension leads and reel adaptors add their own contacts to fail. This is the first thing to rule out because it costs nothing and needs no tools.
3Reset the circuit and retest
If the test appliance is dead, open the consumer unit and look for a tripped RCD or breaker, reset it once, then plug the appliance back in.
ExpectedThe appliance and then the charger run after the reset: the circuit had tripped. If the RCD trips again the moment the charger is plugged in, the charger has an internal fault and needs repair, not repeated resetting
Do not sit resetting a breaker that keeps tripping under the charger. A charger that trips the supply is telling you something inside it has failed, and forcing power back to it risks the fault getting worse.
A blown charger fuse
Most buggy chargers carry at least one fuse, and a blown fuse is a very common reason for a completely dead charger. The location varies by model: an external fuse holder on the case, an inline fuse on a lead, or blade fuses on the internal board. Only test fuses you can reach without opening the charger case.
4Continuity-test the accessible fuse
Unplug the charger from the mains and the buggy, remove the fuse from its holder and test it on the multimeter's continuity or resistance range. The multimeter testing guide shows the method if you have not used continuity mode before.
ExpectedA good fuse beeps on continuity or reads near 0 ohms; an open reading means it has blown and is the reason the charger is dead
Replace a blown fuse only with the same type and rating printed on the charger label or the fuse holder. If the new fuse blows straight away, do not fit a larger one; something inside the charger is drawing too much current and the unit needs professional attention.
A damaged mains lead, plug or plug fuse
The mains lead takes a lot of handling, so a cracked plug, a pulled conductor at the strain relief, or a blown fuse in the plug can leave the charger with no supply while the socket itself is fine. On leads with a moulded plug the fuse is inside the plug top; on a detachable lead the whole lead can be swapped for a known-good one.
5Inspect the lead and test the plug fuse
Look along the whole lead for cuts, kinks or heat marks, flex it gently near each end, then open the plug and test its fuse on the multimeter, or fit a known-good plug fuse of the correct rating.
ExpectedThe charger comes alive with a good plug fuse fitted, or with a known-good detachable lead: the original lead or its fuse was the fault
Never bypass a plug fuse or fit one of a higher rating to make the charger work. The fuse protects the lead, and a lead running without correct protection is a fire risk.
The charger only lights on a connected pack
This is a non-fault worth stating plainly, because it sends healthy chargers to the bin. An automatic charger is designed to deliver nothing, and often to show nothing, until it senses battery voltage at the output. Measured on the bench it looks dead, and reading 0 volts at its DC plug proves nothing. The charger is only meant to respond when it is connected to a pack that is within its wake range.
6Wake the charger on a healthy pack
Plug the charger into a working socket and connect it to a buggy whose pack is at or near its nominal voltage, about 38.2 V rested on a 36 V system or about 50.9 V on a 48 V system.
ExpectedThe charger lights and begins charging: it was working all along and the auto-detect feature was hiding it. Nothing at all on a healthy pack moves the fault to the socket, the fuse, the lead or the charger board
If the pack itself is very flat, the charger may still stay dark because the pack is below its wake range. That is a separate fault covered in Golf buggy not charging, where the fix is a supervised recovery charge to lift the pack back over the threshold.
A failed internal power section
Only once the socket, the fuse and the lead are all proven good, and the charger stays dead on a healthy pack, does a failed charger become the likely answer. A dead internal power section is less common than any of the causes above, which is why it sits last.
Do not open the case to investigate. Charger capacitors store enough energy to give a serious shock well after the mains lead is pulled, and internal repair or replacement of the board is engineer work. At this point the sensible test is a known-good charger of the same voltage and plug type: if that charger wakes and charges your buggy normally, your original charger has failed.
When to book an engineer
Book an engineer if a replacement charger fuse blows immediately, if the supply trips every time the charger is plugged in, or if the socket, fuse and lead are all sound yet the charger stays dead on a healthy pack. These point inside the charger, where the capacitors make DIY investigation unsafe, and an engineer can confirm the charger against a known-good pack before you spend on a replacement.
Common questions
Why are there no lights on my charger at all?
The three usual reasons are a dead socket, a blown fuse in the charger or its plug, and a damaged mains lead. There is also a common non-fault: many automatic chargers stay dark until they are connected to a pack and sense battery voltage, so always test the charger connected to the buggy before judging it.
Should the charger light up on its own before I plug it into the buggy?
Often not. A lot of automatic chargers show nothing on the bench and only wake once they detect the pack at the output. A charger that is dark unplugged from the buggy but lights and charges once connected is behaving exactly as designed.
How do I check the charger fuse?
Unplug the charger from the mains and the buggy, remove any fuse you can reach without opening the case, and test it on the multimeter's continuity range. A good fuse beeps or reads near 0 ohms; an open reading means it has blown. Replace only with the same type and rating on the label.
What if the new fuse blows straight away?
Stop and do not fit a larger fuse. A replacement fuse that blows at once means something inside the charger is drawing too much current, and running it with an oversized fuse is a fire and shock risk. The charger needs professional attention.
Can I open the charger to look inside?
No. The capacitors inside a charger hold enough energy to give a serious shock long after it is unplugged, so opening the case is not a DIY job. Confirm the supply, fuse and lead from the outside, then hand the charger to an engineer if it is still dead.
Is my charger dead if it reads 0 volts on the bench?
Not necessarily. An automatic charger produces no output until it senses a battery, so 0 volts at the DC plug on the bench is normal. Judge the charger only when it is connected to a pack that sits within its wake range.
Did this fix it?
Every guide is written from manufacturer service documentation and workshop practice, then reviewed before publication. Read how we write and review our repair guides.