How to inspect and replace golf cart motor brushes
Written by the Hawke Electric Vehicles Service Team
Quick answer
Replacing golf cart motor brushes starts with isolating the battery pack, opening the commutator end of the motor, and checking each brush against the minimum length in your manual, then fitting new brushes, verifying the springs and cleaning the commutator before you bed them in. This is an advanced job of one to three hours depending on whether the motor has to come off the cart, and it calls for basic hand tools and the correct brush set.
Tools needed
- Digital multimeter
- Socket and wrench set
- Insulated gloves
- Safety glasses
- Fine abrasive pad or commutator stone
- Compressed air or a soft brush
- Small spring scale for spring tension
- Ruler or vernier caliper
Parts needed
- Matching motor brush set for your motor
- Brush spring set if springs are weak
- Electrical contact cleaner
What this fixes
Worn or sticking motor brushes throw off a familiar set of symptoms: a cart down on power or top speed, one that hesitates or surges under load, that squeals or grinds from the motor, or that cuts out and returns as the short brushes lose contact with the commutator. Brushes are a wear item, so renewing them at the end of their life brings back clean, steady contact and full power. This procedure covers the brushes, springs and commutator surface; it does not cover a shorted armature or worn bearings, which are separate motor problems.
Tools and parts
Parts
- Motor brush set matched to your motor
- Brush spring set, if the springs have gone weak
- Electrical contact cleaner for the commutator
You will want a multimeter, a socket and wrench set, insulated gloves, safety glasses, a fine abrasive pad or commutator stone, compressed air or a soft brush for the dust, a small spring scale for spring tension, and a ruler or caliper for brush length. This lands in the advanced range because access is tight and the brushes have to seat correctly, and it runs one to three hours. Always buy the brush set called out for your motor, and always pull the wear limits and spring numbers from your motor or vehicle manual rather than guessing.
How to do it
1Isolate the pack and disconnect the motor leads
With the pack isolated and the capacitors given time to bleed down, label and disconnect the heavy motor cables so you can turn or remove the motor. Snap a photo of the wiring first.
ExpectedThe motor is de-energized and its leads are labeled, so nothing is live and reassembly is clear
2Get to the brush end of the motor
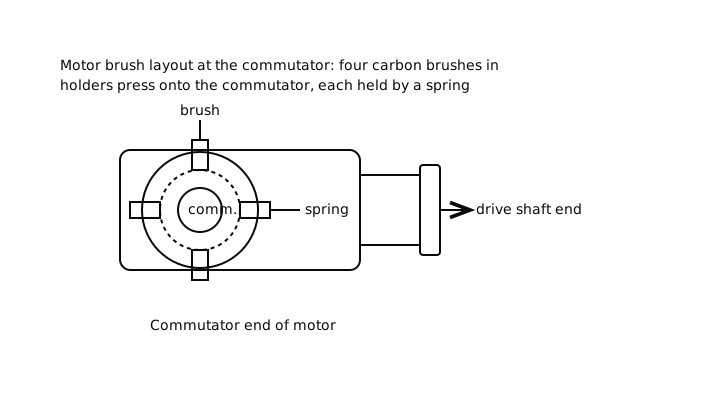
Find the commutator end of the motor, the end opposite the drive shaft, and take off the cover band or end cover that hides the brushes. On some carts you can do this in place; on others the motor has to come out first.
ExpectedThe brushes, springs and commutator are visible through the opening
3Inspect and measure each brush
Lift each brush spring in turn, slide the brush out of its holder and measure it, then check it against the minimum in your manual. Brushes are typically replaced once they wear to about a third of original length or hit a molded wear mark, but the manual number is the one that counts.
ExpectedAny brush at or below the manual minimum, chipped, oil-soaked or worn on an angle is ready for replacement; replace the whole set together
4Check the springs and the commutator
Test each brush spring for full tension with the spring scale against the manual figure, and study the commutator: it should be smooth and an even brown, not scored, blackened or bridged with thrown solder. Blow or brush away the carbon dust.
ExpectedSprings inside the manual tension range and a clean, even commutator; weak springs get replaced, a lightly glazed commutator gets dressed next
5Dress the commutator if it needs it
If the commutator is glazed or lightly scored, dress it with a fine abrasive pad or commutator stone while you turn the armature by hand, then clean the dust off with contact cleaner. Deep scoring or a stepped commutator belongs at a motor shop.
ExpectedA clean, matte, even commutator with the slots between segments clear of debris
6Install the new brushes and springs
Slide each new brush into its holder the right way around so the face matches the curve of the commutator, refit or replace the springs, and confirm each brush moves freely in its holder without binding.
ExpectedEvery brush sits square on the commutator, is held firmly by its spring and slides freely in the holder
7Reassemble and reconnect
Refit the cover band or end cover, remount the motor if you pulled it, reconnect the labeled motor cables to the correct terminals and torque them to the figure in your manual, then reconnect the pack positive first and negative last.
ExpectedThe motor is closed up, the cables land on the right terminals and are tight, and the pack is reconnected in the right order
Check it worked
8Bed in the new brushes and road test
Lift the drive wheels off the ground on jack stands, restore power and run the motor at low speed for a few minutes to bed the brushes in, then set the cart down and take a short, easy test drive.
ExpectedThe motor runs smooth and quiet, power and top speed are back, and there is no squeal, surge or cut-out; the brushes finish bedding in over the first few miles
When to get professional help
Call in a professional if the commutator is deeply scored, stepped or bridged with solder, if the motor still runs rough on new brushes, or if you find scorched windings or a burnt smell, since those point to an armature or bearing fault rather than the brushes. Pulling and pressing a motor, cutting a commutator and testing an armature for shorts all take equipment beyond hand tools. If the motor has to come off and you are not confident refitting the drive coupling and torquing the cables right, that is another fair point to hand it over.
Common questions
How do I know the brushes are worn out?
Pull each brush and measure it against the minimum length in your manual. Along with that, look for brushes worn on an angle, chipped, oil-soaked or so short the spring has nearly bottomed. Loss of power, surging under load, squealing and intermittent cut-outs are the driving symptoms that send you to check them.
Should I replace all the brushes at once?
Yes. Brushes wear as a group, so a full matched set keeps contact even around the commutator. Pairing a new brush with worn ones leads to uneven wear and uneven current sharing, which cuts the life of the new brush.
Do I need to clean the commutator too?
Usually. A light glaze can be dressed with a fine abrasive pad or commutator stone and cleaned with contact cleaner. A commutator that is deeply scored, blackened or stepped needs cutting on a lathe, which is a motor shop job, not a driveway one.
How long do golf cart motor brushes last?
It swings widely with use, load and terrain, so be wary of any single number. Hills, heavy loads and hard acceleration wear brushes faster. The dependable approach is to inspect them at service intervals and measure rather than assume a mileage.
Why do the new brushes need bedding in?
A new brush has a flat face while the commutator is curved, so at first they only meet across a narrow band. Running the motor gently for a few minutes, then driving lightly for the first few miles, wears the brush face to match the commutator and brings contact up to full area.
Can worn brushes damage the motor?
Yes, given enough time. A brush worn down to its spring or its lead can arc and score the commutator, and that arcing and heat can blacken or step the surface, turning a brush job into a commutator or armature repair. Replacing brushes on time heads that off.
Did this fix it?
Every guide is written from manufacturer service documentation and workshop practice, then reviewed before publication. Read how we write and review our repair guides.