How to replace golf cart brake shoes
Written by the Hawke Electric Vehicles Service Team
Quick answer
You replace golf cart brake shoes by lifting and supporting the cart, pulling the wheel and drum, photographing and unhooking the springs, swapping the worn shoes for new ones in the same layout, then refitting and adjusting the brakes. Always do both wheels on an axle so braking stays even. Plan on a jack, jack stands, brake spring tools and about one to two hours.
What this fixes
This procedure resolves the faults covered in these guides.
Tools needed
- Floor jack and jack stands
- Wheel chocks
- Socket set
- Brake spring pliers and hold-down tool
- Wire brush
- Work light
- Safety glasses
- Camera or phone for reference photos
Parts needed
- Brake shoe set, correct for your model, replaced as an axle pair
- Brake return and hold-down springs, if worn or stretched
- Cotter pins or retaining clips, as required
What this fixes
This procedure renews brake shoes that have worn to the point where adjustment can no longer restore a firm pedal. Worn shoes show up as a pedal that stays long even after a correct adjustment, braking that has faded gradually, a grinding or scraping noise as the lining wears through to metal, and, once the lining is gone, scoring of the drum. Fitting fresh shoes returns the full braking surface and, with the drums in good shape, restores proper stopping power.
It also fixes uneven braking caused by one set of shoes being oil-soaked, glazed or worn faster than the other. Because you replace shoes as an axle pair and inspect the drums and springs while the brake is open, this is the point where a tired brake is brought fully back to health rather than nursed along with more adjustment. If the drums are scored past cleaning up, they need attention too, and that is covered below.
Tools and parts
Parts
- Brake shoe set correct for your model, fitted as an axle pair
- Brake return and hold-down springs, if the old ones are weak or stretched
- New cotter pins or retaining clips, as required
Beyond a jack and jack stands you need a socket set, brake spring pliers and a hold-down tool, a wire brush to clean the backing plate, and a camera to photograph the layout before you disturb it. Add safety glasses and a work light. This is an advanced job because of the spring tension and the number of small parts that must go back in the right order; figure one to two hours for an axle pair, and more the first time. If any step feels beyond you, stop and hand it to a technician.
How to do it
1Chock, lift, support and pull the wheel
Set the drive to Tow, pull the key, chock the grounded wheels, break the wheel nuts loose, jack the axle and lower it onto jack stands. Take the wheel off to expose the drum.
ExpectedThe cart is steady on stands with the wheel off and the drum reachable; the wheel should have come off without the brake dragging hard, which would signal a seized adjuster
2Back off the adjuster and pull the drum
Slacken the brake adjuster fully so the shoes retract clear of the drum, then pull the drum. On a hub held by a nut, remove the cotter pin and nut and note how the bearing and washer sit.
ExpectedThe drum pulls off to reveal the shoes; if it will not come, the shoes are still riding on a ridge or the adjuster is not fully backed off, not that the drum is stuck for good
3Photograph the spring and shoe layout
Before touching a spring, take clear photos from several angles showing where each return spring, hold-down and adjuster part sits. This is your map for reassembly.
ExpectedYou have reference photos of the exact spring positions; drum brakes look alike but differ in detail, so your own photos beat a generic diagram
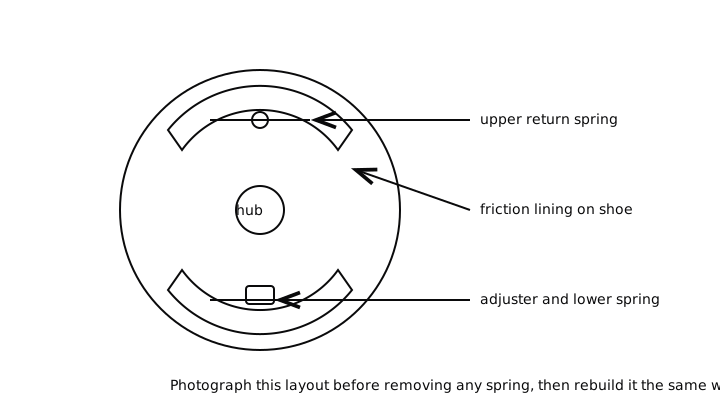
4Release the springs and remove the old shoes
With the spring tools, release the hold-down springs, then unhook the return springs, and lift the worn shoes off the backing plate along with the adjuster. Keep the parts in order.
ExpectedThe shoes come away with the springs safely released; springs that are stretched, heat-discolored or distorted should be renewed rather than reused
5Clean and inspect while the brake is open
Wipe the backing plate and drum clean with a damp cloth, check the drum friction face for deep scoring, and look for oil or grease that would contaminate new shoes. Put a light smear of brake grease only on the shoe contact points on the backing plate.
ExpectedA clean, dry, unscored drum and backing plate; a drum deeply scored or grooved past a light clean-up needs turning or replacing, and any oil means a leaking seal to fix before new shoes go in
6Fit the new shoes and refit the springs
Set the new shoes in place matching your photos, refit the adjuster, then hook the return springs and hold-down springs back exactly as they were. Work the shoes so they sit square and the adjuster turns freely.
ExpectedThe new shoes sit centered and square with every spring in its photographed position; nothing should be trapped, and the shoes should spring back against the adjuster when pushed
7Refit the drum and adjust the brake
Refit the drum, plus the hub nut, washer and a new cotter pin where fitted, then adjust the shoes: turn the adjuster until they drag on the drum, then back off to a light, even drag. Set the other side to match.
ExpectedThe drum turns with a light, even drag once adjusted, the same on both sides; a binding drum means the adjuster is too tight or a spring is misplaced, so recheck before going on
Check it worked
8Bed the shoes in and road-test gently
Refit the wheels, lower the cart, and pump the pedal until it feels firm. Drive gently on level ground and make a series of light stops from walking pace to bed the new shoes in before braking harder.
ExpectedThe pedal is firm and high, the cart stops straight and holds on a grade; new shoes reach full bite after a short bedding-in period, so expect braking to sharpen over the first few gentle stops
When to get professional help
Call a technician if the drum is scored or out of round, if a wheel-bearing or hub seal is worn or leaking oil onto the shoes, if the springs will not seat correctly, or if you are simply not comfortable rebuilding a drum brake. Because a mistake on a brake carries serious consequences, it is reasonable to fit the shoes yourself and then have the finished job checked, or to hand the whole task over from the start.
Common questions
Do I have to replace both sides at once?
Yes. Fit shoes as an axle pair so both wheels brake with equal grip. A new shoe on one side and a worn one on the other makes the cart pull under braking, which is unsafe. Replacing both keeps the braking even.
How do I know the shoes are worn out?
The pedal stays long after a correct adjustment, the lining looks thin against its wear indicator or the metal shoe, or you hear grinding as the lining wears through to metal. Any grinding means the linings are gone and the drum is being scored, so stop driving and replace them.
Can I reuse the old springs?
Only if they are in good shape. Springs that are stretched, distorted or heat-discolored have lost tension and will not pull the shoes back cleanly, which leaves the shoes dragging. Spring kits are inexpensive, so renewing them while the brake is open is sensible.
What if the drum is scored?
A light score cleans up, but a deeply scored or grooved drum will chew through new shoes and brake poorly. A scored drum needs turning within its limit or replacing, which is technician work, so do not just fit new shoes to a bad drum.
Why do the new brakes feel weak at first?
New shoes need bedding in. Their full friction develops after a short series of gentle stops that mate the lining to the drum. Make several light stops from low speed before braking hard, and the bite will sharpen as the shoes bed in.
Do I need to adjust the brakes after fitting shoes?
Always. New shoes sit slightly away from the drum until adjusted, so the pedal will be long until you turn each adjuster to a light, even drag and match both sides. Adjustment is the final and necessary step of a shoe replacement.
Did this fix it?
Every guide is written from manufacturer service documentation and workshop practice, then reviewed before publication. Read how we write and review our repair guides.