How to adjust golf cart drum brakes
Written by the Hawke Electric Vehicles Service Team
Quick answer
You adjust golf cart drum brakes by turning each adjuster until the shoes just drag on the drum, then backing it off until the wheel spins with only a light drag, and setting both sides the same so the cart stops straight. It fixes a long, soft pedal caused by shoes that have worn away from the drum. Plan on a jack, jack stands and about 30 to 60 minutes.
What this fixes
This procedure resolves the faults covered in these guides.
Tools needed
- Floor jack and jack stands
- Wheel chocks
- Socket set
- Flat screwdriver or brake adjusting tool
- Work light
- Safety glasses
Parts needed
- Brake shoes, only if adjustment reveals they are worn out
- Cotter pins or clips, if yours are disturbed on removal
What this fixes
This procedure fixes a golf cart that has developed a long, soft brake pedal and needs a longer push than it used to before it slows. As the shoes wear, the gap between the shoe and the drum opens up, and the pedal has to travel farther to close that gap, so braking feels weak and late even though nothing is broken. Adjustment takes that gap back up. It also evens out a cart that pulls to one side under braking because one drum is set tighter than the other, and it often brings back a park brake that has stopped holding on a grade.
Adjustment is the right fix only while there is enough shoe material left to work with. If the pedal is still long after a correct adjustment, or the shoes are worn thin, the shoes need replacing and the cables checked for stretch. Put another way, this brings a healthy set of brakes back into range; it does not rescue worn-out ones. If braking is completely gone, do not adjust and drive, tow the cart in instead.
Tools and parts
Parts
- Brake shoes, only if adjustment shows they are worn out
- New cotter pins or clips, if the originals are disturbed on removal
You need a floor jack and jack stands, wheel chocks, a socket set to pull the wheels, and a flat screwdriver or a brake adjusting tool to turn the adjuster. Add a work light and safety glasses. This is a moderate job: mechanically simple but done on a safety system, so it pays to work carefully and in order rather than fast. Figure about 30 to 60 minutes for both rear wheels, more the first time while you locate the adjuster on your model.
How to do it
1Chock, lift and support the cart
Set the drive to Tow and pull the key. Chock the wheels staying on the ground, break the rear wheel nuts loose, jack the rear and lower it onto jack stands so both driven wheels are off the ground and free to spin.
ExpectedThe cart is steady on the stands and each rear wheel turns freely by hand; a wheel that already drags hard is over-adjusted or seized and needs backing off first
2Find the adjuster on your model
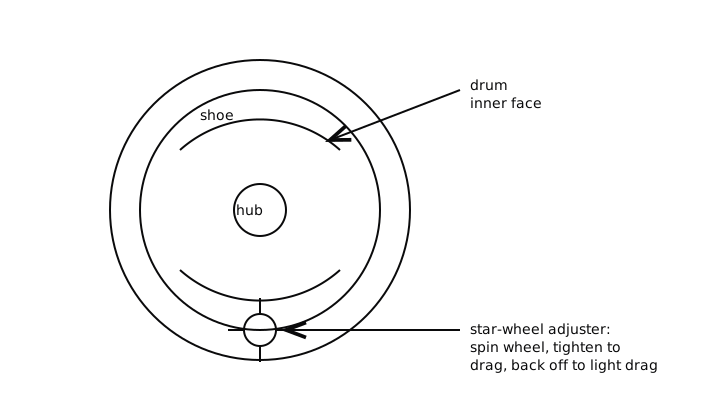
Locate the brake adjuster: many drum systems use a star wheel reached through a slot in the backing plate or drum, while some carts adjust at the cable or equalizer instead. Check your manual for which yours uses before you turn anything.
ExpectedYou can see or feel the adjuster and know which way tightens; on a star wheel, one direction spreads the shoes toward the drum and the other retracts them
3Turn the adjuster until the shoes just drag
Spin the wheel with one hand and turn the adjuster a click at a time with the other, in the tightening direction, until the shoes touch the drum and the wheel gets hard to turn.
ExpectedThe wheel goes from free to a firm, even drag as the shoes meet the drum all the way around; a drag that comes and goes as the wheel turns points to an out-of-round drum or an uneven shoe, not an adjustment issue
4Back off until the wheel spins with a light drag
From the point where the shoes drag firmly, back the adjuster off a few clicks until the wheel spins freely with only a faint, even brush of the shoes on the drum.
ExpectedThe wheel spins with a light, steady drag and no binding; that is the correct running clearance, close enough that the pedal bites early but not so tight that the shoes run hot
5Set the other side to match
Repeat the tighten-then-back-off method on the opposite wheel, aiming for the same light drag so both wheels are set equally.
ExpectedBoth wheels spin with the same light drag; matching them is what keeps the cart from pulling to one side under braking
6Balance the cable or equalizer last
If your model adjusts pedal free-play at the cable or equalizer, take up any leftover slack there only after both drums are set, so the pedal has a firm bite without holding the shoes against the drums at rest.
ExpectedWith the pedal released, both wheels still spin with only the light drag from the drum setting; if either wheel now binds with the pedal up, the cable is too tight and needs slackening
Check it worked
7Test the pedal, then road-test gently
Refit the wheels, lower the cart, and press the pedal: it should firm up much sooner than before. Then drive gently on level ground and brake from a walking pace, building up only as you trust the result.
ExpectedThe pedal is firm and high, the cart stops straight without veering, and the park brake holds on a grade; a pedal that is still long, or a cart that pulls, means worn shoes or a stretched cable that adjustment cannot cure
When to get professional help
Call a technician if the pedal is still long after a correct adjustment, if the shoes are near their wear limit, if a drum is scored or out of round so the drag is uneven, or if the cart still pulls to one side once both drums are matched. These point to replacing shoes, cables or a drum rather than adjusting, and because brakes are a safety system it is smart to have the work checked if you are not sure the result is right.
Common questions
How do I know which way to turn the adjuster?
Spin the wheel as you turn the adjuster a click at a time. The direction that makes the wheel harder to turn is spreading the shoes toward the drum; the other direction retracts them. Set it to firm drag, then back off to a light drag. On most star-wheel adjusters the tightening direction is marked or noted in the manual.
How much drag should there be after adjustment?
A light, even drag, so the wheel spins freely by hand but you can feel the shoes brushing the drum all the way around. Too tight and the shoes run hot and waste range; too loose and the pedal stays long. The goal is the shoes close to the drum but not gripping it at rest.
Why does my cart pull to one side when braking?
Usually because one drum is adjusted tighter than the other, so it bites first. Set both sides to the same light drag and the pull normally goes away. If it stays with both matched, suspect oil or grease on one set of shoes, or a seized cable on one side.
Will adjustment fix a pedal that goes to the floor?
Only if the shoes still have material left and are simply worn away from the drum. If the pedal still reaches the floor after a correct adjustment, the shoes are worn out or a cable has stretched, and those need replacing. Do not keep driving a cart whose pedal reaches the floor.
How often do drum brakes need adjusting?
As the shoes wear, so it depends on use, but a yearly check is reasonable for regular use and sooner if the pedal starts to feel long. Adjustment is a normal part of drum-brake upkeep, not a sign anything failed, until the shoes reach their wear limit.
Do I need to remove the drum to adjust the brakes?
Usually not. Most systems are adjusted through a slot in the backing plate or drum, or at the cable, without removing the drum. You only pull the drum to inspect or replace the shoes, which is a separate job.
Did this fix it?
Every guide is written from manufacturer service documentation and workshop practice, then reviewed before publication. Read how we write and review our repair guides.